This has been a long process, but has been having some great progress! I was given a Macintosh IISI, and it came with a network card in it, so logically I wanted to hook it up to the Internet, but here is the catch, it has no web browser, so what can I do to get one on it? Well, I have been finding the answer, and now I'm ready to start sharing the process!!!

To start here is what I have to work with. I have the Mac, and I can use floppys in it. I have good floppys to use, and a USB floppy drive for my computer. A down side to this is that the only other computers I have are all Windows PCS, I can and have installed *nix distorts on them to work with other programs, but I have had very little success with that, and recently I have had success with the windows machines. On the Mac I have system 7.5 and TCP support which is crucial.

Skip two years of failed attempts at getting anything on the beast, and leaving it for a time then trying again. I have finally gotten it to do something. To clarify a but on the situation, I have tried this exact method before, and not succeeded. But this time it worked! I have my speculations for what I did right this time.

So here we go, this is what I did to get part of the way to a web browser on my Mac.

First, I looked around the Mac to make sure that there was no way to get to the terminal as I have previously discovered. Once I varified that, I thought about making a script,  so I messed around with that feature, but got no where since it still didn't do networking. I then formatted a floppy on to Mac to a dos format, put it in my windows computer and put fetch3.0.hqx on it, I have tried to extract hqx files on my PC and failed many times, but my Mac has StuffIt extractor on it luckily, so I thought I would try that program to extract it (I have tried this before, but I thought I would again). I extracted it into a folder for fetch on the hard drive, and surprisingly it worked! I was very excited that it did! After that I was able to run fetch, an FTP program, and I was super pleased since I have never gotten this far before.

I have had the Mac on the network at home before and pinged it from another computer, but I didn't have fetch then. So my next step is to redo that, and with fetch, hopefully get it into a FTP server. I have one I will try, but if it doesn't work, I have another plan for a local one.

Keep checking for updates, this is getting somewhere!


I have had a Sega Genesis for a long time, and it has had an issue with the power not staying unless you hold it to the side for a long time too. I wanted to fix that issue, as well as clean it since it has had tape on it and was just dirty, so I have finally done that.


This is what the Genesis looked like before the cleaning.


So I started to open it up, and take it apart. It was easy until I was down to the PCB I was not sure how to finish that. I pulled off some of the feet on the bottom to see if there were screws under them. then I realised that there were screws on the cart connector, I did not think that they were holding the board down, but it turns out that they were.


How I was able to look for the power issue, I found that one of the solder joints for the power jack was loose, you can see that here. I found that by wiggling the jack and seeing if anything would move. I resoldered it by flowing the joint and adding solder to make it stronger.

After fixing the solder issue, I went to cleaning the case, I used a cloth for some, but it wasn't working the way I wanted it to so I switched to using a toothbrush and soapy water to clean out the Cheeto and sweat grime.


After that, I wanted to get rid of the marks on it, they looked like they were something like a silver Sharpie mark and some take residue. I used a Mr. Clean Magic Eraser for that, and it worked well. I made sure to be away from the logos and decals because I figure that the eraser would wipe those off.


I found that the eraser was leaving some gross chemical on the surface. so I rinsed the parts in water and let it dry.

I then reassembled the system, and tested it to see if it worked.


It works! Now I can play some Genesis retro games again!


I have been slowly reaching the goal of having a Retro Gaming rig! What I am hoping for is to have late 80 tech that is still functional, or is modded to be modern. Today I used some old tech, to get older tech working on my rig. I turned an old ADB cable (basically just an apple branded s-video cable) into an s-video to commodore video cable!
What I did was solder the leads from the ADB cable to the leads of an RCA style cable. They both use the same Luma Chroma signals, so the system works flawlesly! All I have to do, is plug it in and set the computer to do dual screen with the TV out option!

This screen is not meant for high resolution displaying, but now when I play retro games, I can have the old feel of it. This will be great for if I ever get to stream N64 games to YouTube.

I am really excited that this works, and I hope you like it! I still have to put some sort of insulator on the cable, but it is working, which is exciting!


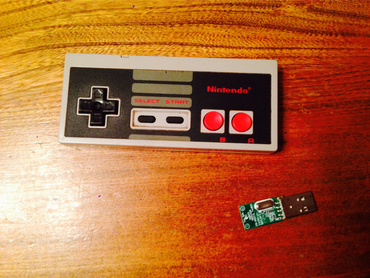
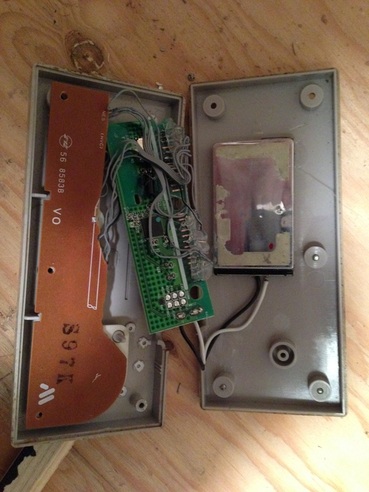
This is a Raspberry Pi 2 inside of a NES with RetroPie on it. This video goes over some of the basic features of the system, and some gameplay! The controller is a wireless keyboard in a NES controller.


This lamp is made out of wood, and is made in the style of a rice paper lamp. I made it for my fiancee (Lara from LightsCameraAnxiety.ca) for a Christmas gift. Let me know what you think!

This lamp took a few days to make, the hardest part was cutting out the panels, mainly because it took so long.

I hope that you enjoy this video, I have more wooden project videos planned, and in progress.

Music is from Vince d'Entremont at www.vincedentremont.com


About a year ago I made a mod on one of my NES Controllers, I make it into a wireless USB controller.

For this project, I used the chip from an old wireless USB keyboard, an old Gameboy Advanced SP battery, and obviously a NES controller.


This mod was a "quick" and fun one, the hardest part was figuring out what combination of pins to use for different key inputs. I spent about an hour or so figuring out which combination it was for the UP key, after this, I realized that I could just set it in software on the computer, instead of spending another 7 hours (one per button) figuring out the rest.

The way it works is simple, I took this chip from a keyboard, and all that the keys on a keyboard are, are buttons with connections to this chip in different patterns to differentiate one key from another. So what I did, is I took the traces from the NES controller, and wired them to the board as if they were keys.

One thing you might notice, is that there is no way to charge the unit, I did that on purpose, the reason I felt that it was not necessary right now to add a charging adapter, is that before I had made this mod, the keyboard was turned on for about 2 years without changing the AAA batteries, and they were still running fairly strong. I later added a power switch to the unit to conserve power when not in use. I decided to use it without a charging adapter, and if needed later on, add one, or remove the battery and charge it. It still has not gone dead, and this was built a year ago.
Here is a video of it working.


Chrome Canary is an early release of the next Chrome Browser, it is designed to accompany development, and to mainly be used by developers. Google Themselves say that Chrome Canary "is not for the faint of heart" and "Be forewarned: it's designed for developers and early adopters, and can sometimes break down completely." However, they also say that it is full of the latest and the newest features.

Chances are, that if you are reading up on the newest web browsers, you are probably save enough to install and try Chrome Canary your self to find out if you like it or not, so you can try it and make up your own mind on it. But if you would like my opinion on it, keep reading.

What is it like to use a product in an early release form?

Early release products can be great, they have the latest features, they have new bells and whistles. When toying around these can be great, but on the down side, they can also be a hassle. If you are expecting the new bell to always work, or to always be there, then Chrome Canary is most likely not for you. They update it almost every day, and this can mean that those pretty bells can disappear Now, if you are using it to have the latest features, and are comfortable with it randomly breaking, then maybe it is a great option for you.

Personally, I have been using Google Chrome for a long time, and I love it, the thoughts of being on the front lines reporting bugs thrills me, and makes me want to help all I can. Also, I like bells, and I am okay with them not being there tomorrow.

This can apply for any beta release of a product, not just Chrome Canary.

Why does it exist?

That would have to be asked to the dev team of Google to get a proper answer, but on their site they say its for developers, so one can assume that its for developers, and people who want to experiment. They list one reason for someone to use it as new integration, so if you had software that worked with browsers, such as plugins, this would be great for you. I am using it to tell you all about it, and also to do some testing for Google.

What are the new features?

There are many small features under the hood. But one of the more obvious features is auto updating, and updating nearly every day. If they find, and fix an issue, they will push down a new updated version.

One thing I find interesting, is that it is more like Google Chrome was when it started, by that I mean that it is slimmed down, back in the day when I first started to use Chrome, it was the fastest web browser, because it was slimmer, and Canary is just that.

Conflusion.

Chrome Canary is the latest easy to use and install internet browser from Google, it has new features, and it is faster. It will be more prone to crashing since its still in development, and it could have totally different features from one day to another.

Personally, if you are interested, want a new browser, want to see the cutting edge, and are okay with the risk of it crashing, use Canary. You can always have both installed to try them out together.
In this post, I will be showing you how to create a small program to backup your files, and how to make this program run on a schedule.
This is an instruction for windows machines (I can post one for Unix machines later if requested).
I was recently in a discussion with a fellow modder here at BitFix about making a logo for the carrying case of his mod, I suggested an acetone transfer might work, but at the time I had no idea what the process was, so I looked into it more. I found out that its pretty easy and can result in very nice prints.
Here is a simple run through of how to do an acetone print transfer.

What you will need:
  • Pure Acetone (the main ingredient in finger nail polish remover)
  • Cloth
  • Image printed mirrored with a laser printer
  • Medium to transfer to (cloth, wood, metal, thicker paper)
  • Something to press with (sort of optional)
  • Tape to hold the print in place
After you have acquired all of the parts, tape the image in place on the medium, make sure it is secure enough it wont move around.

Now dampen the rag with acetone, not too much acetone though, you want to be able to squeeze it and have no drips. Press the acetone cloth onto the image, make sure that you do this over the entire image and that you don't miss anything, and make sure not to over saturate the paper. Let the paper dry, this should take a few seconds, then repeat this as needed, it may take many times. you can undo some of the tape to reveal the image to ensure it is transferring well.
This next picture is very blurry since I was taking it while rubbing the acetone which dries super fast and I wanted to get a shot of it.
Now you can remove the print from the medium and see your newly transfered image, let me know if you have any questions!


I have recently moved my blog! It is totally new now, with only the same name. It is now on Blogger and I find that it is much more sleek. I used to be on Weebly, however I was finding it frustrating to make anything happen and I would have had to pay to have the domain name I bought put on the site (I was not impressed with that). I had used Blogger before but totally forgot about the experience, but when my fiancĂ© Lara started her blog LittleWingedBird.ca―a blog for those struggling (especially with mental health)―she used Blogger and found it to be great. I looked at it, found it to be great, and then I decided to make a switch.

Before I start, I am not bashing Weebly; my time with them was good, they have a great service, but I find Blogger to be much better for me personally.

Desktop Site: Winner Blogger

Weebly is made for general websites with a blog feature. Because of that, they have the whole thing geared to the users who want to make a website easily, and have it work. With that, you will find that even making a blog post feels like creating a new webpage each time. It is time consuming and is fairly frustrating to do.

Blogger is made for blogs; their blog posting setup is basically like making a word document and posting it. It also has features like labels, location, and a handy schedule feature that allows the post to be published for another date.

Mobile App: Winner Weebly

Weebly's mobile app is not actually that bad; it works well for viewing stats, keeping up with your viewers, but the blog posting feature is severely lacking in ease of use.

Bloggers mobile app is better for posting, but you can't view your stats.

Cost: Winner Blogger

Weebly is free but costs money if you want the full features that blogger has, like using a domain name you already own.

Blogger is free to have your own domain name, which is great for me since I already own one through another company. All their other features are free too and just as good as Weebly, if not better.

Getting Views: Winner Blogger

Weebly is alright for getting views; you can get them fairly easily by advertising in other sites.

Blogger is easy for getting views; I had more views in the first hour of using Blogger than I had the last day I used Weebly. Also, its hooked up to everything you use Google for, like my YouTube account, thus, I have recurring views due to that.

Conclusion:

This is based mainly on my experience with the two sites, you can make your own conclusion, use the free features of both to find out for your self if you like.
Blogger
Weebly
I have built another GameBoy mod! This one is a DS Lite mod. Basically, I took off the top screen, I had to add a resistor to make the DS think that the top screen was still on. This mod is more of a nostalgic type mod; I really like GameBoy's. also, I want to add an r4 chip to allow it to play emulated games. I am planning to re-do the paint since it got messed up while it was drying, I just haven't had time for that yet.

This mod took one day to complete, it was fairly easy, and could be completed much quicker if done again.
I am sort of planning to do the same with a DSI XL and rely on emulation for game play, this would let you have a much larger screen to play with.

my next step in this is repainting it, I want to do either the same colour scheme, or I might consider painting it with a SFC colour scheme. 
Over the last break I had from university, I built a wooden ocarina. It has 6 holes, and sounds pretty cool. I made it out of douglas fir, and wenge. I made this short video to show you it being played, I hope you enjoy!
After a lot of working for about three days, at about three hours a day, I have a working fridge that looks like a Game Boy. This idea came to me when I saw something sort of similar online, just a decal for a fridge that looked like a Game Boy, and I looked over at my mini fridge and decided I could build one my self, that is also functional. I found all of the parts, and then decided to do it. The reasoning for the timing of this build; the middle of the 2015 BitFix GamBoy Classic Competition, when I already had the Game Boy Color Advance as an entry,is that I wouldn't be able to be finished in time, so I still wanted an entry, and have all the time I need to finish the other project.

The Fridge is a functional mini fridge, with a custom door that looks like a Game Boy, and functions. Powered by a Raspberry Pi, this Mini Fridge will be a conversation piece for my dorm room, and one day my man cave.

Here is a link to the work log

I created the buttons out of wood by cutting the basic shape on a band saw, then using a belt sander in a vise (Since my floor belt sander hasn't gotten its new belts, I ordered over 2 months ago; they said it would be 7 days) I shaped them. The wooden buttons actuate tact switches, and these are wired up to an old USB keyboard, they are their respective key, except Start is Enter, and Select, is BACKSPACE.

I created the screen section by cutting a large hole in the fridge, and mounting the front bezel of the screen into the hole, then mounting the screen its self.

All of the wires run down a channel in the insulation and out the bottom right beside the hinge, then run to the back of the fridge where the PI is held, I would have mounted the PI in the door had I not worried about both condensation, or wanting to change it for another computer some day. With this design, I can use any computer with a VGA output (The PI has an HDMI to VGA converter) and USB ports.

to keep the cold in, I used loose fiberglass insulation to pack behind the channels, and hoes in the insulation.

I got two of the paints from Home Hardware choosing paint colors and getting them to mix a sample paint can for me, the red I mixed my self and the black I have. If I ever paint on the decals (No real intention for that right now), then I will also have to mix a blue.

The Pi is loaded with a 16 GB Class 10 SD card, so its very fast, and it has RetroPie on it, which is an easy distro with emulation station. A future project might change this out for something new, but I'm keeping it more or less a secret for now.

As far as game play goes, it functions as a Game Boy, but is so large I found myself basically punching the buttons, they press well (other than the right key, its a bit stiff at the moment), but since they are so far apart it make game play a bit awkward, also, you have to sit on the floor to play it.